 Here’s a super quick and very customizable tutorial for some clear vinyl bows! They’re pretty easy to make and don’t require any expensive or rare supplies. You could attach them to hair clips, presents, or headbands (or really anything).
I filled mine with vintage style glitter (and a couple heart confetti’s) since that’s what I had handy but these would work with a variety of fillings! Halloween confetti would be awesome, feathers or lace, band-aids, little images or stickers, or even pompoms and light charms. I tried filling one with little beads but they didn’t stay in place very well, so the lighter the better. Paper products or confetti are ideal for this!
I’m sure there are dozens of ways to make these but this tutorial just covers how I did it. 🙂
Materials Needed:
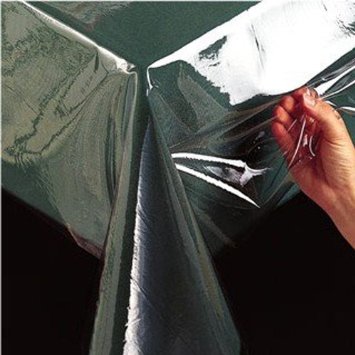
-Clear Vinyl. I cut a bit off of a plastic tablecloth protector from the dollar store that I use for keeping my table clean at photoshoots. Depending on what size you want to make your hair bows you’ll need a few feet of this. Just grab a cheap clear plastic tablecloth at the dollar store, fabric store apparel vinyl isn’t really suitable for this.

-Filling. I used vintage style large glitter. You can find lots of confetti’s at party stores or dollar shops. Glitters from the craft section in dollar/craft stores work well too! Look in the wedding and birthday decorating aisles for cute types of shaped confetti. There are other suggestions for fillings up above.
-Hot Glue Gun and Glue. Not shown in the photos but any type for this works fine.
-Scissors.
-Ribbon. I used black ribbon with a glitter weave to it but any ribbon would be great. It needs to be about 1/2″ wide at least to hide the glue underneath and help keep the bows in shape. Thinner ribbon wouldn’t be strong enough I don’t think.
-Hair Clips. You can find these at the dollar store also in the craft section. I had some fancier ones hanging out in the studio so I used those. I think the stiff alligator style would work best rather than the teardrop shaped type that bends.

Step One
Cut a length of clear vinyl from the edge of the tablecloth. Width will depend on how tall you want your bows to be. I cut mine about 5″ wide and maybe 10″ long so my hair bows would end up being 5″ wide and quite tall when finished. For example, if you want tiny bows cut the vinyl about 3″ from the edge and 6″ deep per bow etc.
Cut two of the same length/depth if you want a pair of bows!

Step Two
Fold the piece of cut vinyl in half and smooth out the fold with your fingers. Make sure it hasn’t collected any lint or hair (which is surely will have as it’s a jerk). Trim any edges so it’s tidy now. You can see in the photo above how mine collected lint/bits, this was taken before tidying it up, the vinyl is a bits of crud magnet!

Step Three
Open the folded vinyl up and take your hot glue gun and run a single line of glue along the edge. You’ll have to do this part fairly quickly as the vinyl will be melty and you don’t want to have to redo the glue. Toss some confetti (or whatever filling) in the center of the square and spread it out a bit.
The vinyl will end up wrinkly and textured, I have yet to devise a way to stretch it while sealing that doesn’t result in wrinkling. I’ll update this if I ever do. I assume it’s just a drawback of working with the table cloth vinyl instead of thicker apparel vinyl. I also like how it looks wrinkly!

Step Four
Fold the glue-free side over and press the edges to seal it closed so the confetti doesn’t fall out.


Step Five
Now that you basically have a square of glued together vinyl with filling inside take your glue gun and make a line of hot glue along the top edge and then carefully lay ribbon on top of this and press in place. Do this for the remaining 3 sides.
I only put ribbon on one side of my bow. If you were planning to attach the bow to a headband or wear it so the back would be visible I’d say put ribbon on the back also to make it look professional.

Step Six
Take your square of vinyl with a ribbon frame and accordion fold it inward, pinch in the center to make the bow shape. You can use a couple dabs of hot glue between the accordion folds to get it to stay put while you ready the ribbon.

Step Seven
Use a small length of ribbon (about 1.5″) and use it to wrap around the pinch in the center of your bow, place the non-serrated branch of your hair clip under this ribbon and glue it down. This will give it a tidy center and keep the clip where it should be!

VOILA! Your own super easy and super cute vinyl bows!
What will you fill yours with?
-Taeden

2 thoughts on “DIY Clear Vinyl Hair Bows with Glitter”